
|
If you have an awkwardly shaped bathroom, you will need to work extra hard to make it feel light, open and spacious. You may have to deal with low or sloping ceilings, slanted walls, lots of corners and tricky alcoves. It is a huge challenge, but the end result doesn't have to be an awkward looking bathroom.
If you have a sloping ceiling, arrange your fixtures to suit. Place the shower and basic in the tall section of the room where you can stand upright, and position the foot end of the bath where the ceiling is lowest, or, depending on the incline, place the bath under the slope. Make the most of the limitations. Although a sloping ceiling creates an odd-shaped room, it offers fantastic potential for natural light by fitting a skylight. A skylight lets in five times as much light as a window the same size. Fix lights flush to the ceiling to increase the feeling of height in the room, and prevent hanging light fittings from becoming a dangerous obstruction. Bathrooms with sloping ceilings are generally quite small. Compensate with bright soft colors, or neutral shades to open out the space. Often it can be difficult to decide where the walls end and the ceiling starts. If this is the case you may end up using the same color on the entire room so it is very important to keep it light. Place mirrors at strategic angles to increase the perceived size of the room, or use mirrors and mirrored tiles to open up awkward recesses. Be clever when planning and use the awkward shapes to the greatest advantage. Consider fitting a large walk-in shower or built-in storage unit in a difficult corner or larger recess. Common problem: The room's awkward shape makes it impossible to fit either a full-sized bath or shower. Solution:
This step-by-step guide will show you how to increase your storage options by making your own shelves out of fiber-board to display and store bathroom necessities.
Tools: Tape measurer, pencil, dust mask, jigsaw, electric drill, wall anchors, wood glue, hammer and panel pins, scissors, hammer and screwdriver. Skill level: Intermediate Time: 2 hours Type: Storage solution
Good idea: During a remodel, fix cup hooks to the bottom of the shelf and use for hanging face cloths, wash bags and loofahs. Sticky-backed plastic comes in some great finishes so you can be as bold or subtle as you like to tie in with your room scheme. 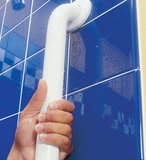 You want your bathroom to be a calm and relaxing haven, but without adequate attention to safety, it could turn into a potential disaster zone. With the dangerous combination of shiny surfaces and hard-edged fixtures, water and electricity, you need to take care at the planning stages of a remodel.
This fact is compounded in cities like Boston and Staten Island where space is already at a premium. Below are a few basic safety tips to consider when planning your next bathroom renovation.
Don't worry if you are stuck with a small, cramped bathroom. Take inspiration from these handy hints and tips on using your space more efficiently and increase the appearance of roominess in your bathroom.
Spatial illusions:
Further considerations:
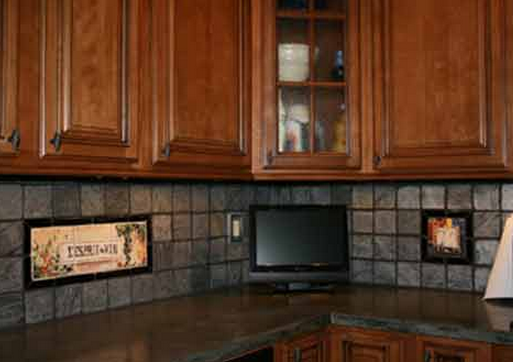 accent tile example - click to enlarge Decorative or accent tiles - around a door or window frame, along a roof line, or stair risers, or behind a wood-burning stove - add architectural interest to a kitchen.
Accent tiles on walls (left) can be installed in two ways: On top of an existing wall in the same manner as any installation, or flush with the wall. You can install accent tiles on top of any sound, smooth, clean, flat surface. Organic mastic is a good choie of adhesive for this type of work. To install accent tiles on an uneven surface - an exterior stucco wall, for example - first glue or screw a piece of exterior grade plywood, cut to size, to the wall. Then attach tiles to plywood using standard thin-setting techniques for applying tile to a wall. To install accent tiles flush with an existing wall, rout out the finish wall materials behind the intended location of the tiles attach tiles with thin-set adhesive following the general guidelines for applying tile to a wall, and use grout to fill in space between tile and edge of wall. On a new wall, plan the tile installation before finishing the backing so tile will end up flush with finished wall. Name and address tiles are an increasing popular kitchen design choice for both personal and commercial signs. It is recommended that these tiles be installed on a plywood backing. A piece of plywood bolted to a wall is much easier to remove when you move or remodel that are tiles installed directly into the wall. Cut a piece of exterior grade plywood to size and attach it to the wall. Then use standard thin-set adhesive techniques to install tiles. Use an edging tile or wood trim to finish the edge of the plywood. Door frames and windows: Tile can be used very effectively to surround a door or window either indoors or outdoors and anywhere in a kitchen or bath area. It will take the place of an be far more decorative than conventional wood trim pieces. Use bullnose or special tiles called windowsills for decorative sills. Set tiles so that rounded edges face outward. If the wall is also tiled, either set windowsill tiles last so that the finished edge of the sill tile is set on top of the wall tile or start at the window to make sure you do not have to cut frame pieces. Use the same setting materials and techniques for any wall installation. Tabletops: A single tile or field of tiles set into a tabletop is decorative and serves the practical purpose of a built-in trivet. If you are settling individual tiles into a table, you'll have to rout a section of the table surface so that tiles will be flush with tabletop. Attach tiles in the same manner as you would a floor install. If you are covering the entire table with tile, treat the project as an island countertop. Picture: Shielding the area on and around cabinets is just one of the many ways to customize a kitchen. Thanks to everyone who made the launch of BKR Pros a success. We look forward to contributing more info to prospective DIY homeowners and experts in 2013 and will miss everything good that 2012 brought. We close out our first year of existence with new city listings including Colleyville, TX kitchen tips and The Woodlands plus Southlake, TX. In the case of Colleyville and Southlake, TX (bathroom projects), we have spotlighted high income cities in the Dallas-Fort Worth area. The same can be said of The Woodlands in Houston. Out of state, Jacksonville and Indy continue to impress from an interest standpoint when it comes to shower advice, and we plan to expand nationwide in the coming months of 2013. Happy New Year and best wishes to all DIY experts out there!
Most experts recommend that you draw your floor plan in two stages: begin with a rough sketch and later refine it, making it a more precise scale drawing of your space. Draw a rough outline of your kitchen on graph paper, marking off windows, doors, appliances, and other fixed elements. If you would like to enlarge the aera, note any adjacent space that you might consider for expansion.
Part 2 coming soon... To remove most stains - including ink, blood, coffee, fruit juice, wine, vegetable oil, and rust - make a thick paste of baking soda and water and apply it to the stained areas. Leave on until paste is dry, then rinse with water and wipe dry. On verticale surfaces use masking tape to hold paste over stain.
Mineral deposits - Wipe with white vinegar or a solution of equal parts ammonia and water, rinse well, and pat dry. You can minimize water stains on tiled surfaces around showers, tubs, and sinks by wiping these areas dry after each use. Mildew: Spray mildewed area with a commercial mildew remover or a chlorinated-bleach solution. Wipe with a solution of baking soda and water to remove the chlorine odor. Stubborn stains. For stains that have penetrated deeply into the stone or bisque, use oxalic acid, which is a strong chemical bleach. Follow directions on the label carefully as this is a corrosive poison. After removing the stain, rinse tile well with water and let dry. Oil: To remove oil from pavers, use a liquid mixture of plaster of paris to draw out the stain. Brush plaster over stain, leave for 24 hours, and brush off with a broom. Repeat as needed. Paint. To remove paint from tile, apply a commercial paint remover, leave on for an hour, then carefully scrape off paint with a razor blade. For general grout maintenance after a bathroom renovation, use a stiff brush, and scouring powder that does not contain bleach. Test the cleaner in a concealed area to make sure it doesn't discolor the grout. Always be on the lookout for chipped and cracked grout and repair flaws as soon as possible. The amount of adhesive needed for a tile installation is determined by the square footage of the surface to be covered. Product labels usually list estimated coverage. Purchase plenty of adhesive in advance so you don't have to interrupt your tile-setting job with a trip to the store.
Organic mastics are purchased premixed and should be stirred before application. Other thin-set adhesives consist of a combination of liquid and dry materials that must be mixed at the job site. Ratios of liquid to dry ingredients vary depending on the product but will be listed on the label. Do not mix more adhesive than you will be able to spread and cover with tile in about one hour. If adhesive begins to harden in the mixing bucket while you are working, it may have begun to cure. Do not attempt to thin it with water or other liquid as this may affect the bond; discard it and mix a new bath. Measure liquid ingredients into a mixing bucket first, then slowly add measured amount of dry ingredients. Stir by hand with a plastic or wood paddle or with special electric mortar-mixing paddles, which can be rented at most equipment rental agencies. Whether mixing by hand or machine, be sure to keep paddles submerged. Lifting them out introduces air into the adhesive, lessening its bonding ability. Adhesive is thoroughly mixed when all dry ingredients are incorporated and it falls off, but does not run off, the mixing stick. Let mixed adhesive rest for about 10 minutes before applying. Applying adhesive - Adhesive is applied in two steps: First it is spread, then combed. Use a notched trowel for both steps. Most adhesive applications require using a small notched trowel, but the exact size depends on the weight of your tile and the type of adhesive used. Recommendations are listed on product labels. Apply adhesive to an area small enough to be covered with tiles during the "open time" of the adhesive. Open time, usually listed on the adhesive label, is the amount of time you have to set tiles into spread adhesive. Begin by working in a one to three foot square section. As you become more proficient, the size of the working area can be increased. Stir rested adhesive once or twice. Scoop a small amount onto flat surface of trowel. Hold trowel with the smooth surface at an angle of about 30 degrees relative to the surface to be tiled. Press adhesive firmly onto surface, using a sweeping motion and making sure all areas are equally covered and no air bubbles have formed. Be careful not to cover reference lines. Turn the trowel so that notched edge is held at an angle of about 45 degrees and comb the spread adhesive. Comb in two passes to make a crosshatch pattern. We've added to our online presence with several new business listings lately:
On Manta On Brownbook On Qype We have also added new remodeling tips in Jacksonville, Indianapolis and San Jose. As the year winds to a close, we want to thank all our visitors and contractors for making our blog launch a success. 2013 looks to be just the beginning for our blog and we look forward to providing homeowners with the best in renovation DIY tips. Since the holidays are right around the corner, we leave you readers with this Xmas gem. Ignore the really strange Mio water video ad at the beginning and enjoy Jimmie and Horatio. |
Remodeling Tip Blog
Archives
March 2023
Recent bathroom and shower articles: Basin Buying Tips | Toilets and Bidets | Shower Choices and Styles | Sink Taps and Fittings | Choosing Flooring & Lights | Flooring tips for bathrooms | Bathroom Wall Tips | Designing With Tile | Dimensioned Stone | Piping Tips | Bathroom Lighting | Learn More About Hiring Bathroom Remodeling Contractors | Bathtub Removal How-To | Japanese Bathroom Tips | Building Contractors vs. Remodeling Contractors | Removing Shower Walls | Mosaic Tile Installation | Cabinet Ideas | Bathroom Fixtures | Tampa Shower Tips | Boston Shower Remodeling | Seattle Shower Remodeling | Sacramento Shower Remodeling | San Antonio Shower Remodeling | San Jose Shower Remodeling |
Indianapolis | Jacksonville | Staten Island Shower Remodeling | Colleyville Kitchen Remodelers | Provo Bathroom Remodeling | Charlotte | Fairview TX Tree Trimming | Categories |
 RSS Feed
