
Attention Park City Utah Residents: View Local Kitchen Remodeling and Custom Cabinet Renovations Below:
sample image
Kitchen Remodeling Tips - Custom Fireplace RenovationsOne of the most popular new trends in areas of Utah like Park City and Salt Lake is placing a fireplace near a kitchen during a home remodeling project. Among all new fireplaces installed today, factory-built units are by far the fastest growing option. Most units are made of steel. Some models include fans that blow air - heated in a plenum separated from the fire - into the kitchen or through ducts to other rooms for additional space heating. We can help assess if your kitchen has enough room for sure a project during a remodeling job. Because of the potential for rough winters, you can never count on a quality custom fireplace enough in Park City, UT.
Conventional wood and high-output gas fires require a double-wall chimney pipe that goes up and out the roof. Most fireplaces that burn natural gas or propane instead of wood burn so efficiently that they can be vented directly out through a kitchen wall with no tall flue required. With advances in kitchen remodeling technology, many of the newer gas fireplaces offer very realistic looking fire. Designing a kitchen renovation an take as much time and attention as the construction phase. A well-planned design is particularly crucial in a major re-design, in which costs are high and room for error is not. For example, if it costs a dollar to plan your kitchen well on the drawing, it will cost you $10 to make a change if your cabinet-maker has already begun, and it will cost $100 to make a change if you don't catch a problem until the crew is on the job site in some cases. However, as the most respected general contractors in Park City, we can help and your satisfaction is 100% guaranteed on all projects. Don't trust your big home renovation to just anyone and give us a call today! View photo gallery of recent Mclean CT Kitchen Remodeling Projects from the Pros at BKR - Custom Kitchen Designs
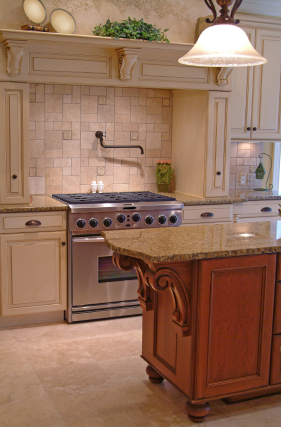
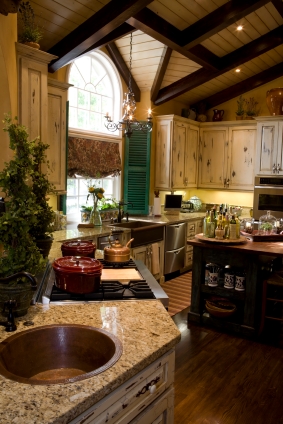
Mclean kitchen remodel tip: Although the house shown above is not very large, every inch of space is used. A pullout pantry and pull-down shelves put items at the fingertips of short or seated cooks. Universally designed storage offers great options for all homeowners in Mclean.
Also consider a people-friendly cleanup center. Washing dishes or clothes may not be the high point of your day, however, installation of a raised dishwasher or convenient laundry center make these chores easier. Raising the height of your washer and dryer during a kitchen remodel or general home renovation also helps you avoid excess bending. We also recommend extra storage to the right of the dish washer. No matter what your needs, we can help. Contact the BKR Pros today for more info on all your home renovation needs in Connecticut. Below are a few pics from a recent Lake Oswego kitchen remodeling job we completed
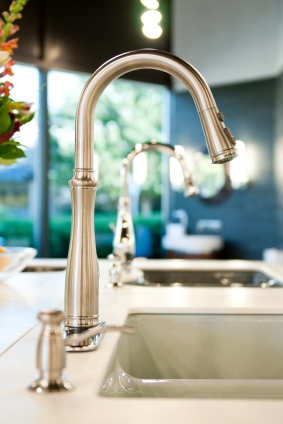
Lake Oswego is home to some of the most beautiful homes in the Portland area. If you need affordable kitchen remodeling, look no further than the pros at BKR. We've been handling home renovations for decades and can walk you through every step of the remodel process. Lake Oswego home remodeling tips: Successful implementation of universal kitchen design does not produce a sterile, institutional look. Instead it results in a functional and attractive setting where your family and friends can savor their surroundings, drawn by a pleasing combination of colors, textures, and surfaces that is heightened by engraving finishing touches, as seen in the Lake Oswego home remodel above, courtesy of our contractor's camera.
The shape of something in a kitchen as simple as a doorknob affects how easily someone can enter and leave a room. Comparably priced level-style door handles are easier to turn than knobs and are available in a range of styles and finishes. Anyone experiencing hand pain will appreciate the action. Plenty of light through the skylights, wide windows, and doors make the kitchen (above) a warm welcoming place. The casement windows open with a crank, which could be motorized, allowing people of all ages and capabilities to operate them. Two zero-step entrances allow easy access, a plus for anyone carrying bags of groceries or pushing a baby stroller or wheelchair. Doors based on universal design are at least 3 feet wide. Level-style handles in these types of kitchen renovations take little effort to operate. A bathroom will be different things to different people. A large family will obviously make more extreme demands on the space than a single householder. A bathroom used mainly by the elderly or young children will involve radically different styling from a room that is used only by a young couple. Planning your bathroom involves assessing your lifestyle, needs a demands - both as they are currently and as they are likely to evolve over the years. It is necessary to ask yourself a few key questions before you start, to help plan the most effective space for you.
Who will be using this room? Look at issues such as the number of people using the bathroom and how often. If you are catering for the demands of a large family whose members will all need the bathroom at the same time, consider installing additional fixtures like a second basin or a bidet to provide additional washing facilities which can be used simultaneously. Think about replacing an over-bath shower with a separate shower enclosure, or installing showering facilities and vanity units elsewhere in the house. You should also consider these adaptations if styling a bathroom for a busy couple who may both need it at the same time. Consider whether the facilities are suitable for all the family. A step-up to the bath is ideal for small children, and also useful for a parent when bathing babies or toddlers. Think about height restrictions and safety - small children may bang their heads on low basins, and tall people will hate bending over low fixtures. If elderly people will be the main users of the space think about installing a special low-sided bath or shower. Elderly or less-able people will also benefit from a higher toilet or raised toilet seat. Consider your choice of taps, too - level-operated fittings will be easier for them to use. If the bathroom will be used primarily by the very young or the very old, you need to pay close attention to safety features such as slip-resistant flooring, thermostatic shower mixens and anti-scald valves. Grab rails at key points in the bathroom such as near the bath, in the shower and next to the toilet are also a good idea. Carefully consider the needs of those who will be using the space and think about what you expect from a bathroom. Are speed and efficiency the most important criteria? Are relaxation and recuperation the crucial ingredients? Or perhaps it is essential to have both at different times, and create a space that is a sanctuary as much as a utility. What type of fixtures: Take time to consider your choice of fixtures during a bathroom remodel, including flooding and wall covering. If children will be using the bathroom, make sure the materials you choose are child friendly. Remember that some materials need more cleaning than others. Lots of pretty bottles and lotions are basins and baths may create an eye-catching display but may not be practical if they are within reach of small children. What are your priorities? Style at all costs, or a hard-wearing, low maintenance environment? Most kitchens will require at least seven separate circuits. The major appliances (except for the refrigerator) each need their own dedicated circuits.
Drawings can be prepared by designers at a local home center and by kitchen remodelers - better preparation when it comes to electrical wiring means a more productive work session an a shorter turn-around time on all projects. If you have an awkwardly shaped bathroom, you will need to work extra hard to make it feel light, open and spacious. You may have to deal with low or sloping ceilings, slanted walls, lots of corners and tricky alcoves. It is a huge challenge, but the end result doesn't have to be an awkward looking bathroom.
If you have a sloping ceiling, arrange your fixtures to suit. Place the shower and basic in the tall section of the room where you can stand upright, and position the foot end of the bath where the ceiling is lowest, or, depending on the incline, place the bath under the slope. Make the most of the limitations. Although a sloping ceiling creates an odd-shaped room, it offers fantastic potential for natural light by fitting a skylight. A skylight lets in five times as much light as a window the same size. Fix lights flush to the ceiling to increase the feeling of height in the room, and prevent hanging light fittings from becoming a dangerous obstruction. Bathrooms with sloping ceilings are generally quite small. Compensate with bright soft colors, or neutral shades to open out the space. Often it can be difficult to decide where the walls end and the ceiling starts. If this is the case you may end up using the same color on the entire room so it is very important to keep it light. Place mirrors at strategic angles to increase the perceived size of the room, or use mirrors and mirrored tiles to open up awkward recesses. Be clever when planning and use the awkward shapes to the greatest advantage. Consider fitting a large walk-in shower or built-in storage unit in a difficult corner or larger recess. Common problem: The room's awkward shape makes it impossible to fit either a full-sized bath or shower. Solution:
This step-by-step guide will show you how to increase your storage options by making your own shelves out of fiber-board to display and store bathroom necessities.
Tools: Tape measurer, pencil, dust mask, jigsaw, electric drill, wall anchors, wood glue, hammer and panel pins, scissors, hammer and screwdriver. Skill level: Intermediate Time: 2 hours Type: Storage solution
Good idea: During a remodel, fix cup hooks to the bottom of the shelf and use for hanging face cloths, wash bags and loofahs. Sticky-backed plastic comes in some great finishes so you can be as bold or subtle as you like to tie in with your room scheme.  You want your bathroom to be a calm and relaxing haven, but without adequate attention to safety, it could turn into a potential disaster zone. With the dangerous combination of shiny surfaces and hard-edged fixtures, water and electricity, you need to take care at the planning stages of a remodel.
This fact is compounded in cities like Boston and Staten Island where space is already at a premium. Below are a few basic safety tips to consider when planning your next bathroom renovation.
Don't worry if you are stuck with a small, cramped bathroom. Take inspiration from these handy hints and tips on using your space more efficiently and increase the appearance of roominess in your bathroom.
Spatial illusions:
Further considerations:
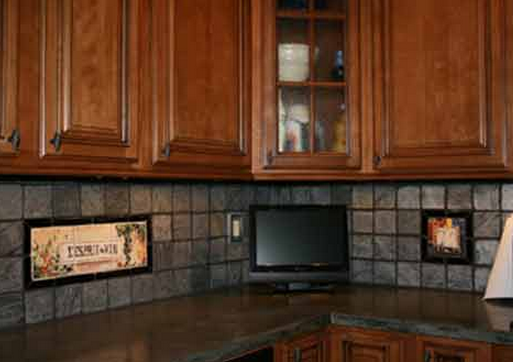 accent tile example - click to enlarge Decorative or accent tiles - around a door or window frame, along a roof line, or stair risers, or behind a wood-burning stove - add architectural interest to a kitchen.
Accent tiles on walls (left) can be installed in two ways: On top of an existing wall in the same manner as any installation, or flush with the wall. You can install accent tiles on top of any sound, smooth, clean, flat surface. Organic mastic is a good choie of adhesive for this type of work. To install accent tiles on an uneven surface - an exterior stucco wall, for example - first glue or screw a piece of exterior grade plywood, cut to size, to the wall. Then attach tiles to plywood using standard thin-setting techniques for applying tile to a wall. To install accent tiles flush with an existing wall, rout out the finish wall materials behind the intended location of the tiles attach tiles with thin-set adhesive following the general guidelines for applying tile to a wall, and use grout to fill in space between tile and edge of wall. On a new wall, plan the tile installation before finishing the backing so tile will end up flush with finished wall. Name and address tiles are an increasing popular kitchen design choice for both personal and commercial signs. It is recommended that these tiles be installed on a plywood backing. A piece of plywood bolted to a wall is much easier to remove when you move or remodel that are tiles installed directly into the wall. Cut a piece of exterior grade plywood to size and attach it to the wall. Then use standard thin-set adhesive techniques to install tiles. Use an edging tile or wood trim to finish the edge of the plywood. Door frames and windows: Tile can be used very effectively to surround a door or window either indoors or outdoors and anywhere in a kitchen or bath area. It will take the place of an be far more decorative than conventional wood trim pieces. Use bullnose or special tiles called windowsills for decorative sills. Set tiles so that rounded edges face outward. If the wall is also tiled, either set windowsill tiles last so that the finished edge of the sill tile is set on top of the wall tile or start at the window to make sure you do not have to cut frame pieces. Use the same setting materials and techniques for any wall installation. Tabletops: A single tile or field of tiles set into a tabletop is decorative and serves the practical purpose of a built-in trivet. If you are settling individual tiles into a table, you'll have to rout a section of the table surface so that tiles will be flush with tabletop. Attach tiles in the same manner as you would a floor install. If you are covering the entire table with tile, treat the project as an island countertop. Picture: Shielding the area on and around cabinets is just one of the many ways to customize a kitchen. |
Remodeling Tip Blog
Archives
June 2024
Recent bathroom and shower articles: Basin Buying Tips | Toilets and Bidets | Shower Choices and Styles | Sink Taps and Fittings | Choosing Flooring & Lights | Flooring tips for bathrooms | Bathroom Wall Tips | Designing With Tile | Dimensioned Stone | Piping Tips | Bathroom Lighting | Learn More About Hiring Bathroom Remodeling Contractors | Bathtub Removal How-To | Japanese Bathroom Tips | Building Contractors vs. Remodeling Contractors | Removing Shower Walls | Mosaic Tile Installation | Cabinet Ideas | Bathroom Fixtures | Tampa Shower Tips | Boston Shower Remodeling | Seattle Shower Remodeling | Sacramento Shower Remodeling | San Antonio Shower Remodeling | San Jose Shower Remodeling |
Indianapolis | Jacksonville | Staten Island Shower Remodeling | Colleyville Kitchen Remodelers | Provo Bathroom Remodeling | Charlotte | Fairview TX Tree Trimming | Categories |

 RSS Feed
